| Audio interfaces set up |
We have different interfaces in different spaces on campus, and you might have an interface of your own. There are of course going to be different options on each, but there are some things to look out for. 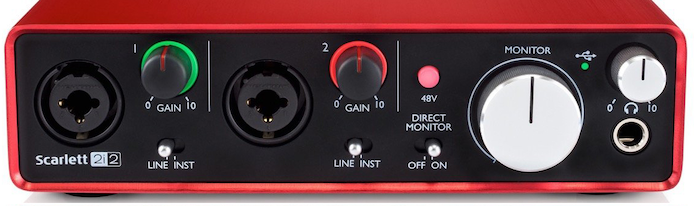
‘Scarlett 2i2 | Focusrite’ <https://focusrite.com/en/usb-audio-interface/scarlett/scarlett-2i2>; [accessed 22 August 2021]
- GAIN CONTROL (PRE-AMPLIFIER): Allows you to adjust the gain (essentially volume) of the signal coming in. The objective is to get it as loud as possible without the risk of clipping (typically indicated by a red light). Test by performing the loudest part you will try to record.
- 48v PHANTOM POWER: Required for "condenser microphones", not required for dynamic microphones.
- MIC / INST / LINE SWITCH: Tells the audio interface what kind of signal strength (also essentially volume) to expect based on what sort of source you've got plugged in. Sometimes an interface may select this automatically depending on what jack is connected. Typically Mic = microphones, Inst = guitars, Line = "line level" such as keyboards.
- DIRECT MONITORING: Do you want to "monitor" (i.e. listen in to) straight from the interface inputs to its outputs (helps monitor with less latency when your computer is struggling)? Or do you want to monitor through your software (e.g. so you can hear the effects you applied)?
|
| Getting your hardware set up |
OPTION 1: IDEAL HARDWARE
Ideally, to complete this task you will have access to:
- An audio interface
- Something to plug in to the interface and record with like a microphone or an electric guitar
- An audio cable to connect your microphone/instrument to your interfaces audio inputs
If you have the following, or are doing so using our equipment on campus, follow these steps to get started:
- Make sure your speakers are off and you are using headphones (otherwise you will get feedback)
- Microphone/instrument plugged in to input 1
- Adjust gain to avoid clipping (a red light will typically indicate clipping)
- Disable direct monitoring (if that option is available)
- If you are using one of our interfaces on campus:
- If using the Focusrite Scarlett 2i2s, ignore the line/inst switch when recording a mic (this is ignored when plugging in an XLR), or choose inst when recording guitar
- If using an Avid Mbox, make sure the switch is set to the rear (XLR) input when recording a mic - or front (TRS) when recording a guitar, and the "sft imt" disabled (which reduces the volume significantly)
- If using the EVO4, there is no source select or source type switch
OPTION 2: BUILT IN MIC
If you don't have access to the above, you can still learn about the steps for recording with a built in microphone of some kind. Most laptops will have this. Or perhaps you can connect something like your headset for your phone or gaming. You will probably find that there are issues with latency and the recording quality, but at least you can cover the basics.
Once again, make sure you also have your speakers off and use headphones (otherwise you will get feedback).
|
| Preferences and latency |
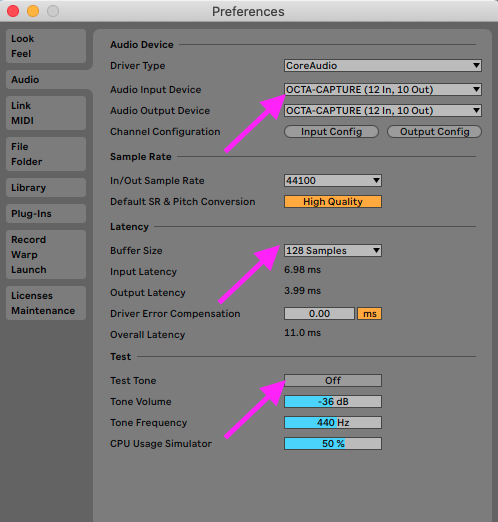
- Go to Live > Preferences > Audio tab and check that your interface is selected as the Audio Input Device (again, the name of the interface will vary depending on what you have plugged in).
- Alternatively, if you didn't have an audio interface you would select something like "internal microphone", "macbook microphone", the name of your headset, or similar.
- Remember that the Buffer size controls the amount of latency you will experience when recording. Larger numbers = more latency (but easier for the computer). Smaller numbers = less latency (but more difficult for the computer, may cause audible pops/glitches when overworked). On most new machines, you can safely select a low buffer size of 128 or lower and experience very little latency.
- You can turn on the Test Tone to check whether you are hearing any audible pops/glitches at a low buffer size, and adjust if needed (just don't forget to turn it off afterwards).
|
|
Note: Windows vs. Mac and using audio interfaces
Note: We used mac computers on campus that use "CoreAudio" drivers. These are the default drivers mac computers come with, which handle low latency well and are suitable for professional audio projects. On Windows, the default drivers are not as good, but can be easily supplanted with free "ASIO" drivers. Your audio interface manufacturer will likely have driver options for you to download from their website. Just make sure the right drivers are selected in the audio preferences. Keep this in mind if you are using Live on a Windows computer at home.
|
| Audio Input |
- You will need an audio track to record to (you can make a new one under Create > Insert Audio Track).
- It's a good idea to rename it first, select the track title bar and press Cmd+R to rename
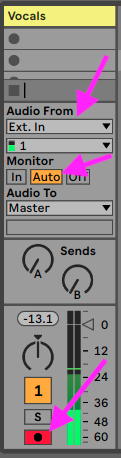
- Set the Audio From to:
Ext In
And input 1, or whichever you plugged your microphone/instrument into (you will see some green bars indicating input activity in the drop down list which can help clarify)
- Set the Monitor to Auto
- Arm the track for recording
|
 |
|
| Recording |

- Once your track is armed, you only need to press the Arrangement Record Button to begin recording.
- Remember that you will need some reference to the tempo, such as other clips to play along to or the Metronome.
- The drop down arrow next to the metronome accesses the Metronome Settings, where you can also select a Count In length.
|
| Comping |

- If you record over an existing clip, you will begin to see take lanes (also found by right clicking the track > show take lanes, or cmd + opt + U)
- These can be used to edit together the recordings into the perfect "comp" (short for composite) and this editing process is known as "comping"
- Use the speaker icon beside each take lane (under the track title) to solo preview that take (which won't delete your comp, it will be return after you disable the solo)
- Use the pencil tool (shortcut B), click and drag on take lanes to promote the best bits up to the comp.
Note, comps can be easier to edit when you have each clip set to a different colour. You can manually recolour clips by right clicking on them. Or change Preferences > Look / Feel > Clip colour to "random" and each new recorded clip will already be a randomised colour.
|
| Practical task 1: Your first recording |
Let's make a simple recording in a new Ableton Live session.
- Make sure you are using headphones and your speakers are off
- Plug in your microphone/instrument and set up your audio interface
- Check your preferences
- Configure an audio track for recording
- Record something into the arrangement view timeline
Even if you don't love your recordings today, just make sure you feel comfortable with the setup so you can repeat this process later. Even if you simply hum, beat box or tap on the microphone, try to get a simple idea recorded. Of course once you have something added to the session, you can edit it, manipulate it and try complimenting it with other layers.
Note: Recording on campus
One of the best/easiest places to do some recording on campus is in the Production Suites. If you need help booking these spaces, speak to music admin. If you need help getting a microphone/instrument connected to record, speak to the tech officer on duty (it is also a good idea to give them a heads up before your session that you'd like some help so they can get things ready for you).
|
| Test your knowledge quiz |
Try the quiz below to see how well your remember some of these important concepts
|