Instructions: Select a step from the menu on the left.
Reveal tabs left
What is automation and why use it?
WHAT IS AUTOMATION
Instructions for parameters to change over time
Viewed as a (pinkish) line through the arrangement, adjusting in height to visualise the varying selected parameter level
USE IT FOR: MIX BALANCE
Make something louder or softer at different moments
Moving pan positions around
USE IT FOR: AVOIDING REPETITION AND CREATING MOVEMENT
Even if phrases repeat compositionally
They don’t have to repeat sonically
Automation can create timbral movement
E.g. open and close a filter, adjust an effect dry/wet
Video overview
For an overview, see this video from Ableton showing how to use automation in the arrangement view of Ableton Live:
Manual automation entry and editing
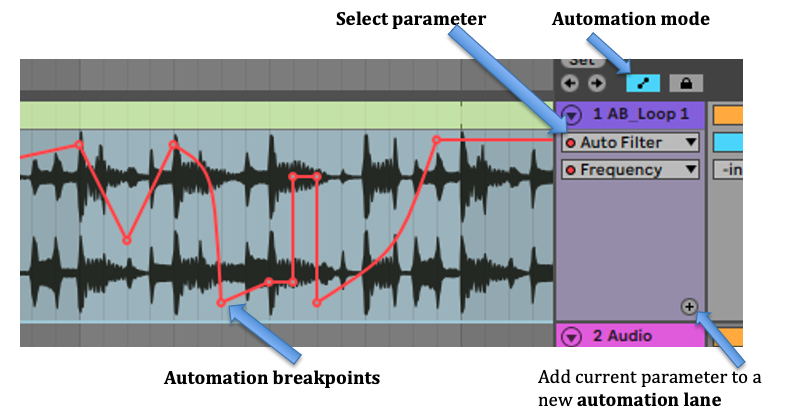
Press the shortcut "A" (so long as the computer MIDI keyboard feature is disabled) or the automation mode button (above the track names) to enter automation mode. You can select the parameter to automate with the drop down below the track name. Alternatively, the last parameter you selected / moved will already be selected (so selecting the parameter itself is typically faster).
Adding and editing automation with the mouse (manual entry) is done by:
Clicking on the red line to add a breakpoint
Clicking and dragging breakpoint to reposition it
Alternatively, use the pencil tool to draw in automation (it will adhere all breakpoints to the current grid size if the grid is not disabled)
Holding the Shift button whilst dragging a breakpoint to “fine tune” smaller edits
Right click a breakpoint and select “edit value” to type in an exact number
Holding Cmd to temporarily toggle the grid off
Hovering the mouse just above or below a line of automation allows you to select and move the entire line
Holding the Option / Alt key whilst selecting a line of automation allows you to create a curve
To view multiple automated parameters at once you can create a new automation lane by pressing the (+) button below the parameter selection drop down.
Removing lanes is done with their corresponding (-) buttons, and temporarily collapsing the lanes is done with the (v) arrow button.
If you modify a parameter manually that was previously being automated, its automation will be disabled. You can right click the parameter and select "re-enable automation" to activate it again for a specific parameter. Alternatively you can press the “re-enable automation” button to at the top of the screen to reactive all disabled automation in the session. This button will only light up when automation has been disabled somewhere in the project.
Recording automation (real time entry)
To record automation in real time, make sure the automation arm button is active. Make sure you don't have any tracks record armed by accident, otherwise you might override content on the timeline. When you are ready, press record and whilst the track is playing, adjust a parameter to begin creating automation.
Extra automation tips
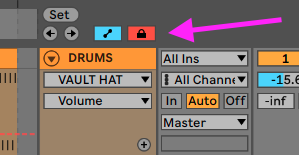
LOCK ENVELOPES
Press the lock button to protect automation from being affected by clip editing
E.g. you are swapping in and out different MIDI clips with different progressions, but want to be able to retain the effect automation
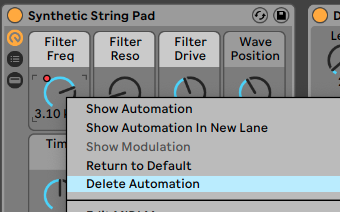
DELETING ALL AUTOMATION FOR A PARAMETER QUICKLY
Right click menu on the parameter > delete automation
There are other useful automation related shortcuts in the right click menu too
THE DANGER OF AUTOMATING VOLUME
One parameter I would advise you not to automate is your track fader
Why? Because any parameter that has been automated can no longer be manually adjusted (without accidentally breaking the automation)
So mixing becomes really difficult, as every volume change needs to be made as automation
THE ALTERNATIVE: USE A UTILITY PLUGIN
The audio effect called "utlity" has a few simple features, including a gain dial
Add one to your track that needs automated volume adjustments, and automate that gain dial instead
Leave the track fader as an overall mix level adjustment tool
Note that the gain dial runs from -inf to +35, which is a different scale than the track fader (-inf to +6)
THE TASK: Adding automation
Here's a creative challenge to try:
Find a few simple loops (e.g. a drum, bass, and chord part)
Duplicate them several times, so you have many repeats of the same loops
Whilst it sounds very repetitive right now, your challenge is to use automation only to create interesting movement and change. Here's some ideas:
Try using lots of audio effects on your loops, and automating various parameters. Many will have a "dry/wet" which is a good one to automate.
You can try automating things like volume (ideally, utilising the "utility" effect as described in the previous step) to create fade ins and outs.
Try adding automation in different ways: clicking in breakpoints, using the automation shapes from the right click menu, and recording.